Showing posts with label Pinterest Done Wrong. Show all posts

Thursday, March 5, 2015

DIY Taxidermy Repair

As a kid, I was never allowed a pet for allergy reasons, but I remained obsessed with furry creatures.

Age 2: I followed a friendly cat into a poison oak-laced hedge (I blocked all memory of the resulting agony, but everyone assures me it was bad).
Age 9: my mother lost me in Liberty House Department Store because I snuck inside a circular rack of rabbit-fur jackets...

They were rabbit jackets a la Cagney and Lacey opening credits.
Really, nothing has changed.


Apply thrift shop mink hat and I become Comrade Tanya

Since our family is between cats, I try to provide the Badgerettes with "pretend pets." Like this one:
I've seen real cat-sized versions of this mini, and they "breathe." Beyond terrifying.

On a whim, I brought home this unique Goodwill find:
Comrade Chipmunk


I was certain that Chippy here was just another craft fair toy made from scraps of god-knows-what fur. But The Man knew instantly: "Why did you buy someone's amateur taxidermy project?"

"Wha--? You...you mean it's a REAL chipmunk?" I sputtered.

He nodded, confident, noble, and a little disappointed. I don't call him The Prince of The Forest for nothing: the man knows a chipmunk when he sees one.

After carefully examining Chippy, I had to agree. No seams, hard interior form. It was indeed a taxidermy chipmunk. After a wave of giggly embarrassment, I felt a little grossed out and somewhat guilty.
I mean, who doesn't want a woodland creature friend? But, you know, LIVING.

Suddenly, I remembered devastating rear view mirror images of a chipmunk I mashed years before because I so feared slamming on the brakes and waking up my first-and-never-napping-unless-continually-driving-6-month-old.

I intended to rid myself of this little bit of road kill, but Badgerette #2 was instantly, deeply in love, so Chippy stayed.

Then, the inevitable happened: Chippy lost his tail in an incident of excessive childhood affection.
It's an old story: Girl meets taxidermied Chipmunk, Girl cracks off taxidermied Chipmunk's tail, Girl cries...
Chippy joined the ever-growing box of broken toys, mugs, and jewelry that The Prince and I always intend to repair...and occasionally do.

FOR THIS REPAIR PROJECT, YOU WILL NEED THE FOLLOWING:

1 broken amateur taxidermy chipmunk
1 sheet of wax or parchment paper
1 rubber band (not too strong)
A bit of Gorilla Glue
A drop or two of water, (Gorilla Glue directions insist on water to start curing process)


Assemble your items.
 Dampen chipmunk derriere. Put a drop of Gorilla Glue on chipmunk derriere...
 Dampen tail. Put drop of glue of the broken end.


 Hold two parts together until glue becomes gummy and bubbly.  This is not a quick process. Use your time to contemplate the error of your ways...

Wrap rubber band around chipmunk parts, nestling them together so the plastic interior is hidden.

Let it dry overnight.

After the kids go to bed, make up tasteless jokes about your new movie idea--50 Shades of Chipmunk.
"Bound and kneeling on the wax paper floor, Chippy suddenly realized that they had forgotten to set up a safe word."
In the morning, I released Chippy from his bonds. Ok, I realize that I probably didn't repair him the right way, but it's done. Other than the rock hard tufts on his tushy, he seems ready to play again...gently. 


This morning, I found myself humming,"I got 99 problems--" 

(like this busted pin table)
"--but Chippy ain't one."

VISIT HappyBadger

copyright 2015, Tanya Monier

Monday, November 4, 2013

DIY: Party Dress Chair

I have not been making hay while the sun shines. This glorious autumn, I have, in fact, been napping while the sun shines.

Yesterday's cold snap woke me back up. The days of outdoor sanding and spray paint are at an end this year in the Northeast. Time to move indoors and finish what I started....

One August evening, I had a real win-win kind of night. After a great date with my hubby, I dropped off our kids' favorite teen-aged babysitter at her home and returned to my home with several fascinating items from her neighbor's curb.

One was a single straight-back chair. Intriguing lines, but with a hideous yellow-toned glaze and seriously chipped veneer seat panels.

First things first: strip off the seat and apply paint remover to the glaze. GLOVES and GLASSES, Friends, are essential. One drop of paint stripper will burn a hole right through your heaviest pair of jeans in about a minute. It will eat your skin for an afternoon snack.

I envisioned a kitcheny 50s turquoise blue for the frame. Ikea's been doing a lot of this lately, too, so I figured it would be available for regular mortals. Not so, but I was able to buy a tube of tint in the right color and then add it to a base paint. Again, Wallauer's employees rock!


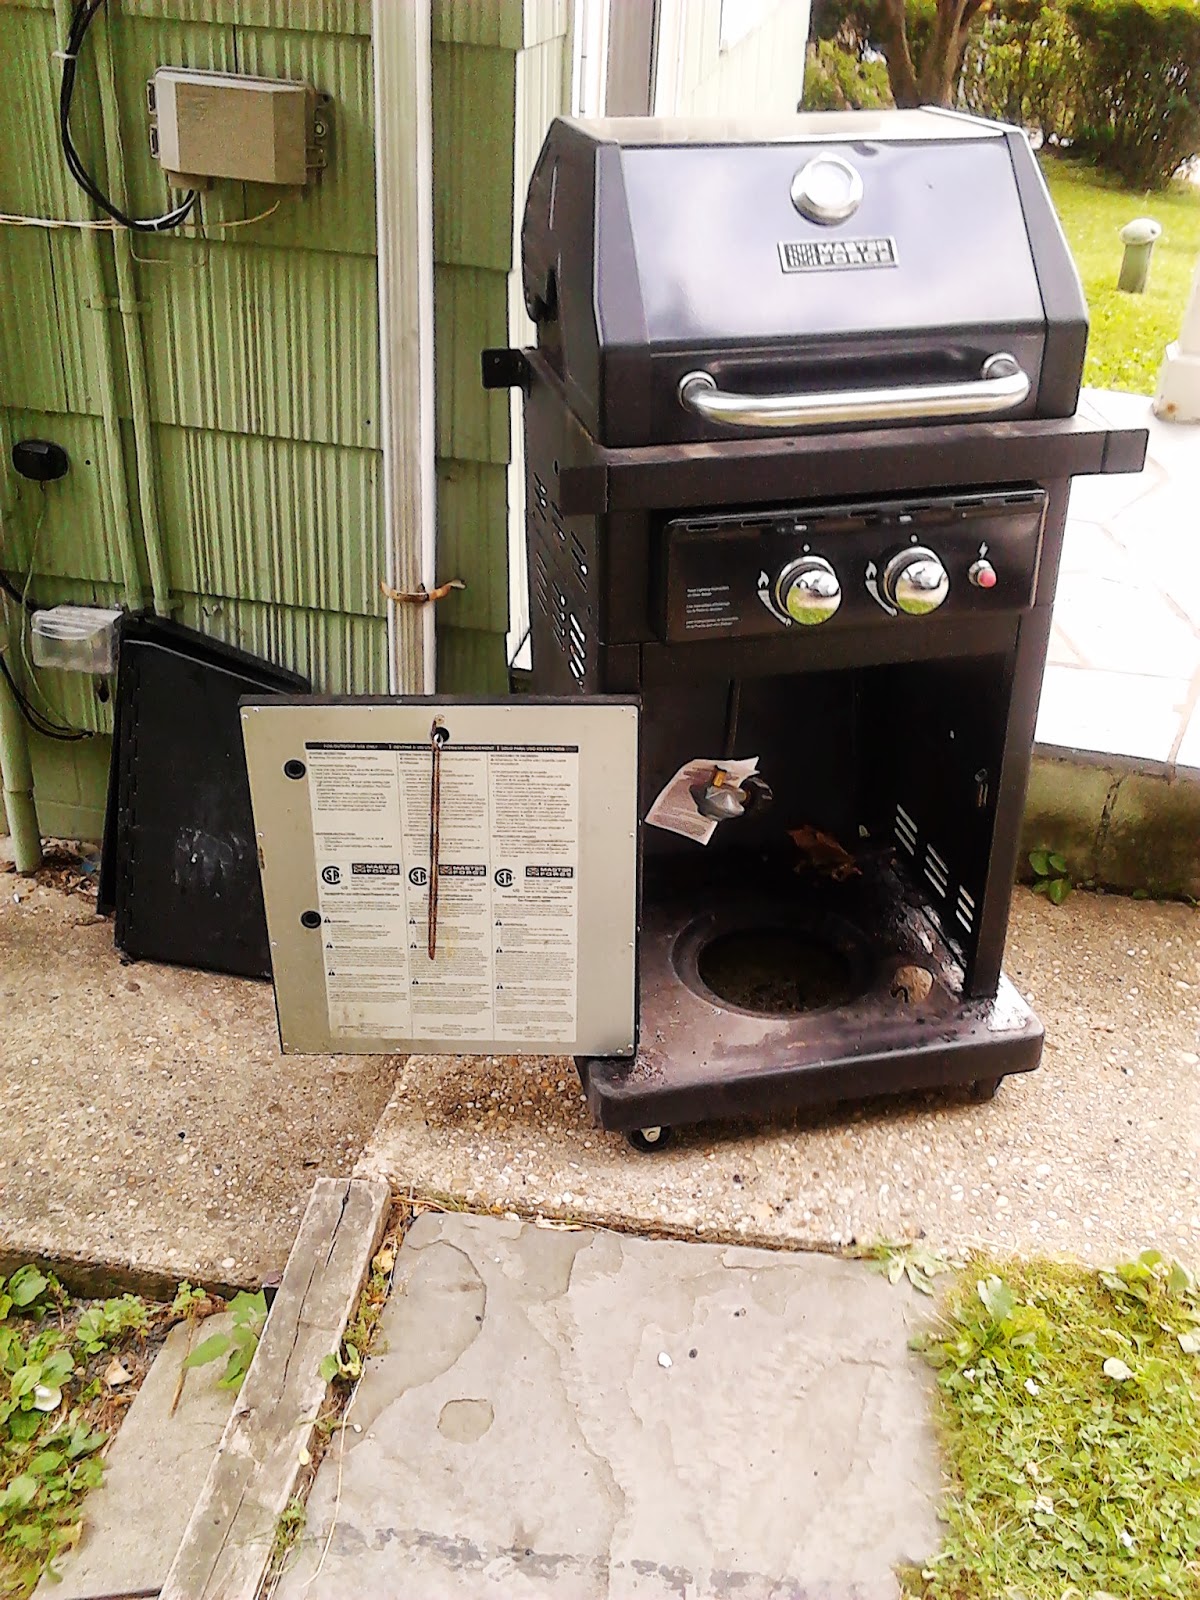
After paint-stripper and thorough sanding. Mixing the color tint into the base paint--super easy. (Note the FrankenGrill in the background, glaring at me with accusing eyes.)

Two coats of paint and a different camera angle, showing even more of the chaos that is my back patio.


On to the seat cover. I was feeling the goofiness of this chair now, so I decided to echo that in a polka dot pattern. Since polka dots were cool a few years ago for clothing, but not for upholstery, I plowed through a few Goodwill stores. Two girl's size 16 party dresses looked right.

To get a sense of what potential buyers might like, I posted this pic with this caption:
 "Two girl's dresses. One must die to make a seat cover. Choose."


Friends got emotional about this imperative, and we had a lively discussion of market tastes and 80s kitsch going for a while. But, really, there was no choice in my mind. The pink had to die to make the chair live.

Last night, I finally got to work.
The materials: 1. Vintage (pronounce it this way: "Old") cotton batting, 2. Staple gun, 3. (not shown) Fabric shears.
 
 
 Our victim: The party dress. Relax, it won't feel a thing...


First off, the built-in white cotton underskirt. It made an excellent base to contain and reshape the seat's old batting.
Treat the fabric like a gift box and get wrapping! Tuck your fingers in...or else.
 
 Ready for layer two.
 
 I checked the dots to make sure that they lined up evenly on both sides of the chair. No tape measures for me, but I think I did OK. Symmetry counts, so if you want to try this, pull the fabric evenly for each staple and switch from side to side of the seat.
 
 A staple here...
 
A fold there....

An unexpected staple to my stomach.... KIDDING! But, please, don't imitate my style. I am just glad that this move didn't go terribly wrong.Probably that stool was the worst work surface ever. Anyway, I trimmed off the excess fabric with the fancy shears, shot in a bunch more staples for fun, and here it is!

What a cutie. Don't you want this in your daughter's room? In yours?? Fine with me!

In the end, I know I made the right choice between the two party dresses. The other dress had dots that were too small.


Now, I wonder if I can convince someone to wear what's left of the dress as a top with a tiny peplum look...


Copyright 2013, Tanya Monier


Thursday, October 31, 2013

Eh, I Give Up, pt. 2: Outdoor Grill Frankenstein

Sometimes, I see an object on the curb and get a Victor Frankenstein Genius Idea for a project. I lug it home, brag about it on Facebook, get to it, and then slowly realize how completely and utterly I am out of my depth. Then, I hang my head in shame. Thus, my Halloween confession begins...

Not our 1960s grill, but you get the idea.
When my family hosts a backyard BBQ, we use the classic 1960s charcoal grill left behind by the last owner.

It is hardly a fancy object, but it does a fine job, which is what first drew my attention to the curbed gas grills.


Weber 47700401
I believe that this grill made its debut in the 60s
TV classic Lost In Space.
I pass at least one a week, year-round. Each time, I feel a pang of dismay—are these handsome, brushed steel behemoths so poorly crafted that Westchester folks have no choice but to cast them aside to rust upon our trash heaps? Compostable, they undoubtedly are not.

One fine garbage day in early summer, I passed one such grill, just around the corner from my home. It struck me as delicate and...um...cute, which I do realize is a non-standard adjective for a grill. I decided to make it mine and give it an entirely new life.


I hauled it in to the back end of Snowflake, our esteemed minivan, and made my first discovery: without the gas tank, these grills are surprisingly light.

Some few minutes later, we returned home, and as I removed the grill from Snowflake, I made my second discovery: blackened, dried BBQ fat is well-disguised by black enamel paint; also, there is no way to disguise blackened, dried BBQ fat that has smooshed out on beige minivan carpet.


Ice chest under the lid, shelves with supplies underneath...
can't you see it for what It could be?
Undaunted, I meditated on the disemboweled body—umm, gas grill—for some days. My soul was torn.

"Should I make it into a sewing machine desk?" I asked my dearest husband.


"It's too tall for a sewing machine. And you don’t sew! And you have a perfectly good sewing machine desk in the basement! Plus it'd need a lever to drop the machine down because the top isn't high enough--" he kept going, pointing out the obvious flaws in my rash proposal. Thank the heavens for this engineer in my life. An English tutor without friendly direction is indeed a lost soul.

Then, as if by divine communication, my path became clear—I would Frankenstein this gas grill into a permanent outdoor ice chest, server, and storage spot for plastic cups and dishes.

I praised myself for this idea, so clever and unexpected for a gas grill, yet utterly appropriate for its outdoor habitat. Arrogantly, I envisioned the innumerable Pinterest reposts of my unique creature--oh, I meant accomplishment.

Emboldened by my plan, I began in earnest the task of cleaning the filthy body. Tearing out its useless, dangling tubes and inflexible, thin metal ribs (oops, grill) proved to be the easiest part of my endeavor.

Scouring off the infinite layers of charred fat, however, drove me near to madness. Muscles aching, skin scratched and bloodied with my near-useless efforts, I finally sought, buried deep within the kitchen sink cabinet, the alluring path of ease: Easy Off.

Three thorough coatings and my task neared its finish. Smooth, shining black enamel was revealed. My eyes were delighted, but my hands, particularly my fingertips and nails, felt frankly weird.

Then came sudden and shocking recognition of my haste and self-admiring dreams! I had not read the directions on Easy Off can. Thus, I did not wear gloves during my operation, as plainly directed on the can.


Ruefully, I realized that once again... I Did It Wrong.

Some weeks away from my resurrected grill were required to heal. My nails, though clipped nearly to the quick, continued to pull away from their fleshy bases. Internally, I felt no better from this misadventure; I was, in short, freaked out.

My loving husband, too, was genuinely irritated and worried about my recklessness. “What were you thinking? You have to wear gloves with Easy Off! It says so all over the can! It’s unhealthy—it’s dangerous—not to!”

I feared pointing out a truth so raw that I could not speak it aloud: I had always prodded my husband to clean the oven and thus knew nothing of the actual labors of oven-cleaning.

My ardor for working with metal waned with each week. I returned to my first passion, woodwork, and felt a healthy resurgence of my confidence (well, yes, there are toxic paint stripper and oil-based products to contend with, but at least I know to put on the gloves now).

Questioning men, who for their livelihoods worked with metal, regarding how to insert an ice chest where once only a grill had existed left me as baffled and uncertain of my next steps as I just felt while constructing this very sentence.

Through the early, brilliant days of autumn, the black metal carcass mocked my failure with its very presence.

And it took up space.

Finally, my husband intervened. “That thing should probably go back to the curb now. At least it’s really clean. The recycle guys can take it now.”

So, I watched from behind split curtains as my great dream was tossed unceremoniously into the back of the recycling truck.


And I, deeply chastened, thought savagely to myself, “Screw Pinterest.”
 

Copyright 2013, Tanya Monier


Monday, October 28, 2013

Eh, I give up, pt. 1: Dining Chair Bench Bamm-Bamm

Last year, one of my Santa Barbara friends--let's call her Mama Beja (Hey there, Mama!)--Facebook-posted a genius idea from Pinterest: garden benches made out of old dining chairs.


Audrey Rush, on Pinterest, has more great Garden Furniture pins!


Moments when the project still seemed doable
Thanks to my worst tenant ever, who left many vanloads of stuff behind when she finally moved out, I happened to have four busted wicker-seat dining chairs in the attic. One afternoon this summer, I got ambitious and broke down the chairs to use as a frame for the bench.

Despite old glue, this task was harder than I expected, so I pulled out a saw, a claw-head hammer, and a mallet to help me out.

Holy heck! I felt GREAT banging away at these chairs. I annoyed half the street with an hour or so of "Bang-bang! WHAM! Bang-craaaack-BAM!" I did not care. I finally understood how blissed out The Flinstones kid, Bamm-Bamm, feels when he's doing his noisy, aggravating thing.


Just imagine black, curly hair and add a tie-dye T-shirt and you'll be seeing me! (Image from fanpop.com.)


Then, a little too much like Bamm-Bamm, I got carried away and broke the frames to pieces.

I still thought I could do something involving a lot of glue to salvage the project, but I was in denial. A few weeks later, my husband shook his head in silent dismay. With the rest of the trash on the curb, he dropped the broken chair carcasses, which looked way worse than the pictures here. (I stopped taking photos after I cracked a couple legs.)

Guess I had a lot of lousy tenant anger to work out on those poor chairs.


But, worry not, Folks! This is Westchester, so I found three more fabulous chairs on the same day that I found Lady Giraffe.

 
I'll try not to go to town on these three....


 Copyright 2013, Tanya Monier


Thursday, September 12, 2013

Why I Do Things Wrong: 3 examples


My dad and mom are remarkably competent, multi-talented people who believe in the following principles: 1. Do It Yourself; and 2. Do It Fast.
When I apply those principles to repair or upcycle my finds, however, I tend to focus on #2. That means I usually skip reading directions and so…I Do It Wrong.

It drives my husband insane. He’s got “engineer mind.” There’s a right way in the mind of an engineer: you read up, you plan, you prepare all surfaces, you measure twice, you cut once….

 
Huh? What? Yeah, I’m still here. I just stopped paying attention at the word “measure.”
Trust me, I understand the importance of organization. But something intensely arrogant lives within me that refuses to follow the path of the Planner. As a result, I all too often find myself in a DIY hell of my own making.

Example 1
I brought home my first battered 1930s vanity table when I was 19. I paid $15 for it at a Sacramento yard sale. Abandoned paper wasp nests clung to the underside. An 8 inch long strip of English walnut veneer had been torn away from the bottom drawer. (This was the early 1990s, before we had photography, so don't complain about missing pics, ok?)
Inspired by my new find, my father took me to a wood supply warehouse. I sniffed a new kind of heaven there. Sadly, such fine walnut veneers were no longer available in the regular market, so I bought something I thought was reasonable: a red-toned mahogany. In retrospect, it was, at best, a cheap interloper next to the dignified walnut burl.

Later that day, I felt wildly confident as I explained my plan to my mom: “I’ll strip off the bottom drawer veneer, replace it with this piece, and paint it to match the others!”
Rather than review the handbook on furniture repair that my highly-skilled woodworking neighbor had loaned me, I jumped right in. With a sharpened chisel.

Half an hour of chipping away at the veneer weakened my arm muscles. To give tired muscles a break, I turned the chisel around, towards me. Two chips later and I jabbed the corner of the chisel directly into my left wrist. I still have a one centimeter keloid scar where the chisel balanced itself in my flesh for one nauseating moment.

I love showing off scars, don't you?
 

After weeks of real work, I did turn out a passable repair and renovation on that vanity table.

These days, however, I’m plain stumped by the most basic DIY tool: spray paint.
It’s intensely colorful and quick. But it just refuses to do what I ask.

Example 2
Drips everywhere! “Sand them,” an artist friend says. When I did that with this potentially cool mid-century desk chair that I found in Armonk, the following coat looked like…this.

Now what do I do?

Example 3
This lamp, a Sleepy Hollow Village curb find, was once stuffed with colorless dried flowers and grasses.


Cleaned out, scrubbed up, and quickly sketched on with a gold-colored Sharpie—ripping off a Pinterest idea my craftiest mama friend sent me—the base looked good.

And it’s working fine, thanks to my husband’s handiwork.
(The last time I tried to repair lamp wire, I sliced through the webbing between two fingers and raced to the ER for stitches: another moment of self-induced DIY hell.)
But then, I just had to tempt fate with the lamp shade. I saw a gold foil shade in Better Homes and Gardens, and decided it would be clever to experiment with gold spray paint that I picked up for $.10 at a local yard sale. For once, I used a light hand with the spray. No drips.
Looked fine by the light of day, but at night--!


Again, I ask: Now what?
Should I...ugh, Trash It?

Copyright 2013 Tanya Monier