Monday, January 27, 2014

DIY: Spacers in the Closet

So, I went from Hibernation to Hyperventilation about one hour after I last posted. Suddenly, I had a lunch date with an honest-to-god adult--during which I had to step out to make one of my day's three Craigslist sales (cuz I'm still an annoying adolescent)--loads of friends phoning, and a hubby back at home.

Such rapid social and economic opportunities made my heart race in a way that reminded me why regular trips to the gym are essential. And today, a good mama friend and I did our time on the treadmill.

When I got home, I felt curiously awake, a rare feeling during this dull, icy winter. I had to DO SOMETHING...and this is it:

This Old House magazine had an interesting article on closet organization. Their suggestions seemed reasonable, especially one for setting up permanent separators on upper shelves between piles of sweaters. TOH suggested wooden shelf supports.
 Straighten Up when planning to redo your bedroom closet 
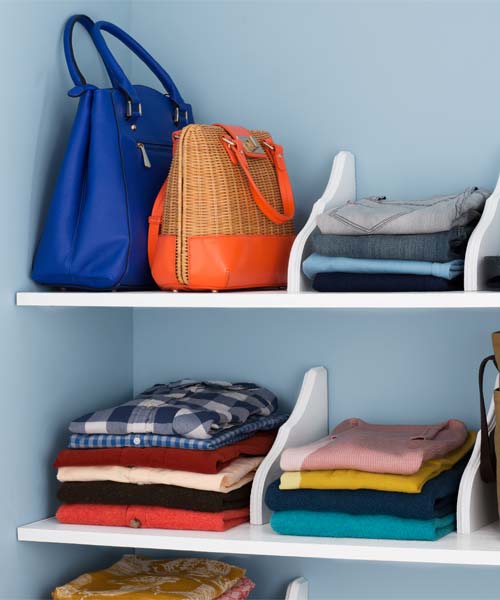
Isn't that CUTE? Who the heck has only two bags and six shirts?

Fine, fine: but when I dragged the kids down to the Home Despot, I was turned off by the $10+ price per piece and went home empty-handed. Yes, I do have that kind of self-control--occasionally, I am awed by myself, too.

Ikea, on the other hand, has me in its thrall. After dropping off The Man at Newark Airport, I popped in to the nearest Ikea that I could find (this means Paramus rather than Elizabeth; given NJ traffic flow, it was easier to go 10 miles away than to figure out how to cross the street from the airport). 25 minutes later, I walked out with $100 of frozen meatballs, drink syrup (so very good on freshly fallen snow), gingersnaps, and die-cut metal shelf brackets, a steal at 2/$5.
EKBY MÅNS Bracket, black black 11 EKBY MANS, baby, 2/$5.


According to tradition, I should not have completed this project until August, but as I noted above, I was feeling wakey-wakey today.

IF YOU WANT TO TAKE ON THIS PROJECT, YOU WILL NEED:

*    several shelf supporters/brackets
*    a ruler
*    a pencil or marker
*    drywall screws
*    a screwdriver

Step 1:
Hold one shelf support up to the back wall of the closet. I started in the middle. Jab dots onto the wall through the screw holes...try to hold the bracket vertical.

 See the tiny dots? I changed my mind and decided that 14" spacing made more sense than 16" for my closet
 
Step 2:
Measure 12-16 inches and repeat Step 1. Then do it again. And again and again and again, if you are so inclined.

Step 3:
 
Hold a bracket/supporter against the wall so that you see the dots through the screw holes. Now, jam a drywall screw into the wall and screw it in. Repeat for the lower hole (do you really need me to spell this out?), then repeat for each bracket.


Step 4:
Blow off the drywall dust.

Step 5:
Put your clothes back in neat piles.


If you are like me, this is a great opportunity to do the following:
1.  put away summer clothes;
2.  flip all your sweaters and shirts right side out;
3.  toss about a third of these shirts and sweaters into a bag to sell or donate. So glad the 90s look is hot with today's young people.

Step 6:
Take a picture! Let's see if these brackets will help maintain The Pretty...

 BEFORE The Pretty was The Not Pretty...

Copyright 2014, Tanya Monier

Thursday, January 23, 2014

Hustle and Snow: 2 things that don't go together

I know, I know: I chose to leave sunny, desicated California and live in New York, a state with weather mood swings like an Emo-adolescent.

Every day this winter, I wonder, "Which will you act like today, New York--Canada or the Caribbean?"

More often than not this January, the answer is clearly Canadian. Oh, Canada....
Man, I was just there, all zen and warm in Santa Barbara for the New Year

What has living in the Brrrr! and not having a regularly scheduled job taught me?

1. I am a mammal, the hibernating kind.
2. I'm never going to meet my summer Trip-For-Trash goal by sleeping during the kids' school hours.
3. I will look even more ursine if I don't cut out night snacking and day sleeping.
Thanks, Wikipedia, for the pic
Jeez, and you wonder why I don't take more selfies...

But how to remotivate? The bed is warm, the basement is arctic, and the hubby is away for the week.

Suggestions?

Copyright 2014, Tanya Monier


Friday, January 10, 2014

DIY: Silver Platter Magnet and Chalk Board

Ugh, Vacation Hibernation. Got back from California days ago, but somehow I'm still radically jet-lagged. I'm not just on California time: I'm on Hawaii time.

I have had such a productive trip, too, that my ambition is to write a brilliant novella for you, modestly titled, "What I Did on My Winter Break."

Must begin somewhere, however, so let's do a quick DIY.

For this project, you will need the following:

One magnetized serving tray (suggestion: Take a magnet with you to a thrift store)
Chalkboard paint
Sponge brush
Metal sand paper
Hand drill...or, in this case, a lathe with drill bit
Clamps, to hold tray to work surface
Grain alcohol and a cotton pad

2 feet, or so, strong ribbon, ideally velvet

Step 1:

Mark out 2 spots, about 3 inches apart, to drill holes for ribbon to loop through and hang.

Step 2:

Drill holes.


Mountain Dan, aka the Prince of the Forest, was delighted to use his lathe--a pre-parenthood extravagance, dontcha know--to drill these holes for me. If you live in the Tri-State area and want to make the drive to our place, he'll take care of this step for your project, too. Otherwise, he recommends the following:

* Clamp the tray on two sides (not the ones you want to drill) to a solid work surface.
* Put on some protective eyewear--metal shards!
* Drill, Baby, Drill 

Upaid plug for 3M Wet or Dry Paper. Works!
 

Step 3:

Rub area you will paint with fine grit metal sand paper. (If you use regular sand paper, or rough grit, you will rip up the metal surface; I have no idea how that will affect the outcome, so you are on your own, Friend, if you take that path).

Wash the magnetized tray thoroughly, then rub with alcohol pad to increase paint adherence.

Step 4:

Paint 2 or 3 coats of chalkboard paint on sanded area of tray. Follow directions. Give it time to dry, etc....

Step 5:

Lace ribbon through holes. Tie bow or whatever.
Hang!

I didn't know how well the chalkboard paint would work, but it's great!

I love the finished product. You will, too if you make one...or buy mine. Please.

Copyright 2014 (WHAT? Already??) Tanya Monier