Monday, January 27, 2014

DIY: Spacers in the Closet

So, I went from Hibernation to Hyperventilation about one hour after I last posted. Suddenly, I had a lunch date with an honest-to-god adult--during which I had to step out to make one of my day's three Craigslist sales (cuz I'm still an annoying adolescent)--loads of friends phoning, and a hubby back at home.

Such rapid social and economic opportunities made my heart race in a way that reminded me why regular trips to the gym are essential. And today, a good mama friend and I did our time on the treadmill.

When I got home, I felt curiously awake, a rare feeling during this dull, icy winter. I had to DO SOMETHING...and this is it:

This Old House magazine had an interesting article on closet organization. Their suggestions seemed reasonable, especially one for setting up permanent separators on upper shelves between piles of sweaters. TOH suggested wooden shelf supports.
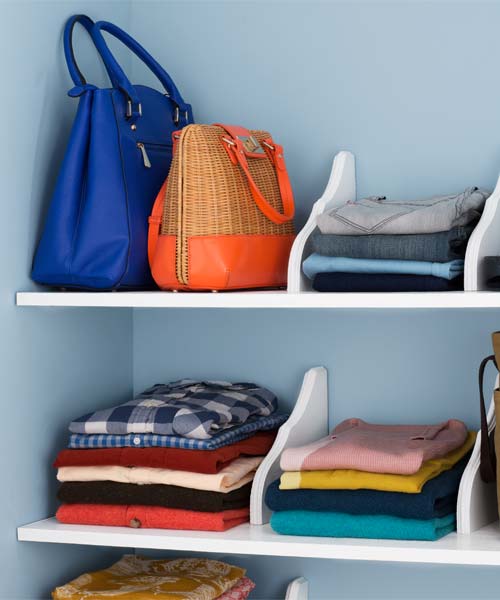
 Straighten Up when planning to redo your bedroom closet Isn't that CUTE? Who the heck has only two bags and six shirts?

Fine, fine: but when I dragged the kids down to the Home Despot, I was turned off by the $10+ price per piece and went home empty-handed. Yes, I do have that kind of self-control--occasionally, I am awed by myself, too.

Ikea, on the other hand, has me in its thrall. After dropping off The Man at Newark Airport, I popped in to the nearest Ikea that I could find (this means Paramus rather than Elizabeth; given NJ traffic flow, it was easier to go 10 miles away than to figure out how to cross the street from the airport). 25 minutes later, I walked out with $100 of frozen meatballs, drink syrup (so very good on freshly fallen snow), gingersnaps, and die-cut metal shelf brackets, a steal at 2/$5.
EKBY MÅNS Bracket, black black 11 EKBY MANS, baby, 2/$5.


According to tradition, I should not have completed this project until August, but as I noted above, I was feeling wakey-wakey today.

IF YOU WANT TO TAKE ON THIS PROJECT, YOU WILL NEED:

*    several shelf supporters/brackets
*    a ruler
*    a pencil or marker
*    drywall screws
*    a screwdriver

Step 1:
Hold one shelf support up to the back wall of the closet. I started in the middle. Jab dots onto the wall through the screw holes...try to hold the bracket vertical.

 See the tiny dots? I changed my mind and decided that 14" spacing made more sense than 16" for my closet
 
Step 2:
Measure 12-16 inches and repeat Step 1. Then do it again. And again and again and again, if you are so inclined.

Step 3:
 
Hold a bracket/supporter against the wall so that you see the dots through the screw holes. Now, jam a drywall screw into the wall and screw it in. Repeat for the lower hole (do you really need me to spell this out?), then repeat for each bracket.


Step 4:
Blow off the drywall dust.

Step 5:
Put your clothes back in neat piles.


If you are like me, this is a great opportunity to do the following:
1.  put away summer clothes;
2.  flip all your sweaters and shirts right side out;
3.  toss about a third of these shirts and sweaters into a bag to sell or donate. So glad the 90s look is hot with today's young people.

Step 6:
Take a picture! Let's see if these brackets will help maintain The Pretty...

 BEFORE The Pretty was The Not Pretty...

Copyright 2014, Tanya Monier

Thursday, January 23, 2014

Hustle and Snow: 2 things that don't go together

I know, I know: I chose to leave sunny, desicated California and live in New York, a state with weather mood swings like an Emo-adolescent.

Every day this winter, I wonder, "Which will you act like today, New York--Canada or the Caribbean?"

More often than not this January, the answer is clearly Canadian. Oh, Canada....
Man, I was just there, all zen and warm in Santa Barbara for the New Year

What has living in the Brrrr! and not having a regularly scheduled job taught me?

1. I am a mammal, the hibernating kind.
2. I'm never going to meet my summer Trip-For-Trash goal by sleeping during the kids' school hours.
3. I will look even more ursine if I don't cut out night snacking and day sleeping.
Thanks, Wikipedia, for the pic
Jeez, and you wonder why I don't take more selfies...

But how to remotivate? The bed is warm, the basement is arctic, and the hubby is away for the week.

Suggestions?

Copyright 2014, Tanya Monier


Friday, January 10, 2014

DIY: Silver Platter Magnet and Chalk Board

Ugh, Vacation Hibernation. Got back from California days ago, but somehow I'm still radically jet-lagged. I'm not just on California time: I'm on Hawaii time.

I have had such a productive trip, too, that my ambition is to write a brilliant novella for you, modestly titled, "What I Did on My Winter Break."

Must begin somewhere, however, so let's do a quick DIY.

For this project, you will need the following:

One magnetized serving tray (suggestion: Take a magnet with you to a thrift store)
Chalkboard paint
Sponge brush
Metal sand paper
Hand drill...or, in this case, a lathe with drill bit
Clamps, to hold tray to work surface
Grain alcohol and a cotton pad

2 feet, or so, strong ribbon, ideally velvet

Step 1:

Mark out 2 spots, about 3 inches apart, to drill holes for ribbon to loop through and hang.

Step 2:

Drill holes.


Mountain Dan, aka the Prince of the Forest, was delighted to use his lathe--a pre-parenthood extravagance, dontcha know--to drill these holes for me. If you live in the Tri-State area and want to make the drive to our place, he'll take care of this step for your project, too. Otherwise, he recommends the following:

* Clamp the tray on two sides (not the ones you want to drill) to a solid work surface.
* Put on some protective eyewear--metal shards!
* Drill, Baby, Drill 

Upaid plug for 3M Wet or Dry Paper. Works!
 

Step 3:

Rub area you will paint with fine grit metal sand paper. (If you use regular sand paper, or rough grit, you will rip up the metal surface; I have no idea how that will affect the outcome, so you are on your own, Friend, if you take that path).

Wash the magnetized tray thoroughly, then rub with alcohol pad to increase paint adherence.

Step 4:

Paint 2 or 3 coats of chalkboard paint on sanded area of tray. Follow directions. Give it time to dry, etc....

Step 5:

Lace ribbon through holes. Tie bow or whatever.
Hang!

I didn't know how well the chalkboard paint would work, but it's great!

I love the finished product. You will, too if you make one...or buy mine. Please.

Copyright 2014 (WHAT? Already??) Tanya Monier

Friday, December 20, 2013

Phoning It In: Project Updates

A Happy Badger is a busy badger, and whooo-wee am I busy. You are, too, I'm sure, so I'll keep this short.

I wanted to add a few updates to past projects, which I wrote about before finishing or having photos ready.

"We're Playing With Broken Glass!"

The jewelry rack and mirror--which we made out of an antique straight-backed chair, a busted hallway mirror, and lotsa hot glue--is all finished now. A few abandoned brass key hooks and brass drawer pulls have a new life as jewelry hooks.

"Is it for sale?" you ask with baited breath. Why, yes, it is....

"Why I Do Things Wrong: 3 Examples"

You may remember this post, you may not. It's funny, and worth (re)reading.

Anyway, I mentioned sticking a chisel, exactly like this one in fact, into my wrist while removing a tattered veneer from my first renovation project, an antique vanity table.

A few Sacramento Friends remembered the vanity table, but the rest of you loyal readers (all seven of you, and I cannot express how much I love you) might want to see the piece and decide for yourself if my blood was well spent.


So, Here It Is!

 Ya like? Ya like?
 
 
Which drawer is real and which is Memorex?
 
Real English walnut:


Mahogany veneer, painted to look like walnut, maybe:
 
Today, my mom mistook the painted one for the real, which is like an early Christmas gift for me.
 
Then, she demanded, "So, when are you getting this thing out of our house?" Sigh, brief Christmas this year.

Any takers?

Copyright 2013, Tanya Monier

Tuesday, December 17, 2013

Where to Take The Excess, pt. 5: Furniture Sharehouse

"$29.99 for a used reading lamp--at Goodwill?!"

Goodness knows I love my Goodwill, but too often, I'll check out the price of an armchair or child's desk and gasp at their nerve. And if I'm giving my stuff away, I don't want it to be priced so that the people who need it can't afford it.

Giving It Away. NOW.

Instead of just grumbling about the state of things (like I just did), seven years ago, Kate Bialo, with the help of The Junior League of Westchester on the Sound, created something amazing and essential-- Furniture Sharehouse, a furniture bank out by the Westchester Airport.

I met Kate Bialo, the Executive Director of Furniture Sharehouse, on an icy Wednesday morning.
This is Kate Bialo. I want to be her--all brains and all heart...and organized.
One glance around, and my heart warmed enough that I could forget my freezing toes.

Kind-eyed volunteers were helping clients select items of furniture to help rebuild their lives. Some lost everything they owned after being evicted from apartments. Some were foster kids who had aged out of the system. Some had run from abusive partners with nothing but their children and their lives. One bleary-eyed, but smiling, Yonkers woman had worked through the night, then rode two different buses so she wouldn't miss her chance to get her children beds, chairs, and a table for their new apartment.

 Bless the volunteers: the temperature, inside and out, was exactly the same 27 degrees on the day I visited.

So, how does this place work?

Furniture Sharehouse takes referrals from 30 local agencies, which often cover the $25 referral fee for their clients. Based on availability, need, and family size, clients then get to select essential items: mattresses and headboards, some chairs, a table, a sofa, a dresser, a nightstand, a mirror, two lamps, two end tables, a few incidentals...  

Each client's choices are identified by color; piles of furniture--tagged pink, yellow, blue, etc--are collected and moved into trucks by more volunteers.

Delivery fees--$75 to the curb or $150 to set up inside--are covered by the clients. This expense alone is too heavy for many, Bialo notes. Ashamed, many will simply miss their appointment--for which they waited 6 weeks--because they can not cover the entire delivery cost.

A new start, about to be loaded into the delivery truck
 
Since the Furtniture Sharehouse opened 7 years ago, it has given away more than 37,000 pieces of furniture to more than 7,000 families. 


Impressed? Want to help? Here's how!

1. Donate Goods: Here's the list of what they accept (Don't worry. We'll find another place to take your massive buffet and your waterbed....)

The Sharehouse itself has very short business hours for drop off: Wednesdays and Thursdays from 9:30 to 11:30 a.m, plus the 3rd Saturday of each month from 9:30 to 11:30 am.

But they do have MUNICIPAL COLLECTION BINS: 
CITY OF WHITE PLAINS: 87 Gedney Way, Weds. 2:00 - 4:00 pm, Sat. 9:00 am to 12:00 pm (April - October only)
LARCHMONT/MAMARONECK: Maxwell Avenue Recycling Facility: Mon, Tues, Thurs, Fri 8:00 - 3:00; Sat. 9:00 - 11:45; closed Wednesdays (year-round)
VILLAGE OF TUCKAHOE: 15 Marblehead Road (year-round); Mon - Fri 6:30 -11:00 am & 12:30 - 2:00 pm

The bad news is that you generally have to be a resident to drop off, and no mattresses--which they desperately need!--can be dropped at the bins.

Clearly, we need to set up Municipal Collection Bins here in the River Towns.

2. Donate Funds: Bialo needs to raise more than $80,000 each year, just to cover warehouse rental and trucking costs. Any amount you can donate will help, and it's tax-deductible: Click here to learn more.

So, Westchester Friends, be proactive. Tell your friends about the Furniture Sharehouse now and save them from saying, "Oh, gosh, I wish I knew about that place before I threw all that stuff away!"

Not a Westchester Reader? Check out the web site of Furniture Bank Association of North America, which lists their US and Canadian Furniture banks by state. (And may I just add, good show, Northern California!)

Do Good, and make this Badger happy--Donate Today!


Copyright 2013, Tanya Monier

Thursday, December 12, 2013

DIY: Saving Bedside Table

Last summer--I think it was last summer--a mama friend unloaded a box of items from her home into my open arms. Some of the items, like these two carved elephants, were claimed by the kiddos.
Like their real counterparts, these elephants
cover a huge territory and can be found foraging
anywhere in our home.

Others languished in the back patio, like a homey maple bedside table with tattered, yellowing varnish.

Normally, I love natural wood, but this piece just seemed too country-cozy and dated.

In the waning days of summer, however, I kicked into Manic Squirrel Overdrive, even putting my children to work. We hauled this bedside table onto the grass and attacked with 120 grit sandpaper.

After all varnished surfaces were well sanded, I tried out a shell shaped drawer pull that I picked up at The Cherry Door. Ah, potential! Now, for a dose of color to evoke the sea.

The gentlemen at Wallauer's Design Center in Ossining never let me down. When no standard color seemed lively enough, they pointed out the custom tints chart. Bingo!

"For tinting Latex, Alkyds, Oil, Acrylic, Polyvinyl, etc."
By "etc," they mean "Your Clothes and Flesh." Be warned. 


Benjamin Moore Alkyd, Base 2, was able to support thorough tint saturation.

To lower the potential for kitsch, I chose Benjamin Moore's Alkyd "Atrium White" for the inner cubby. (Let's be clear: I have nothing against kitsch per se: you can see examples of that here, here, and here.)

Everyone raise a hand now to high-five me!-- for once, I remembered to use painter's tape on the dry turquoise edges before slapping Atrium White all over the interior. BTW: pull off the tape while the fresh paint is still fresh, to clean up any bits that inevitably get under the edges.

And here it is! Breezy ocean smell not included.
 
After my friend saw what a new coat of paint could do, she reclaimed it. I am returning this piece to her tonight. Hee, hee--I love my life!
 
 
Copyright 2013, Tanya Monier


Monday, December 9, 2013

DIY: How to Destroy a Perfectly Nice Leather Miniskirt

I have fantasies about paying for my family's next trip to Europe by selling my clever little crafts, especially my rather fabulous bookmarks. After a few local craft fairs, I must admit the sad truth: Craft does not pay. The money is in the "trash" resale business.

Still, I understand the fun and satisfaction of crafting. Sometimes, it's a sanity saver...a pricey little sanity saver.

To keep expenses low, I repurpose throwaway items and Goodwill finds. Here's an example:

DIY: LEATHER BOOKMARKS

For this project, you will need the following:

* One leather or suede skirt, ideally stained or otherwise ruined for regular wear
* A ruler
* Sewing chalk or pencil
* A pair of fabric shears or a very sharp blade
*1" Ribbon Clasps (available on Etsy--or from me, since I have literally hundreds)
* Jump Rings (widely available at craft stores and online)
* Needle nose pliers or Super Strong Fingernails
* Old beads and pendants
* Flexible jewelry wire (we strip insulation from trashed lamp cords to get copper wire)

For this demonstration, let's use this silvery-coated leather Esprit micro-mini, which I bought for $3 at the genius St. Barnabas Church Clothing Sale in Irvington, New York. It's a size 13, so lots of leather to work with.


Found these monstrously heavy 80s Overkill
earrings in a $10 Jug-O-Jewelry from Goodwill.
Here we go!

1. Slice out the lining.
2. Lay flat. Mark out 1" x 9" strips, using ruler.
3. Cut. Be bold! Fear will show in wobbly edges.
4. Clamp ribbon clasp to one end of leather strip, using pliers.
5. Pick out a pendant or a couple beads. You may need to attach them to each other using jewelry wire.
6. Attach to ribbon clasp loop using a jump ring. TWIST open jump ring for easy re-closing.

 Recognize bits of 80s Overkill earrings?

You can use old velvet or fabric ribbons, too; just trim to desired length, clamp a ribbon clasp on both sides, and attach pendant or beads to both ends.
 
Check out the Etsy shop from Nyack's own Sew What's New--super selection of vintage fabrics and ribbons.

Um, that's it. A cute way to encourage reading!

These are also mine, available at A Nu Toy Store in Tarrytown.


Guess what you are all getting for Christmas this year?


Copyright 2013, Tanya Monier